
If your company maintains an external project file (e.g. MS Project, P6, Excel, etc) for tracking and managing the Project Activities, you can easily import the Activities into Crews by Core to avoid manually creating or copying those Activities.
Creating Activities from Import File is a great way to quickly populate many Activity details fields without having to manually type information into the create Activity form.
Importing Files into Crews by Core can also be used for updating Activities which have already been previously created from prior Import File runs - e.g. you imported 20 Activities last week and this week, you want to run the import to reflect updates in the shifted Start and Finish Dates for those Activities.
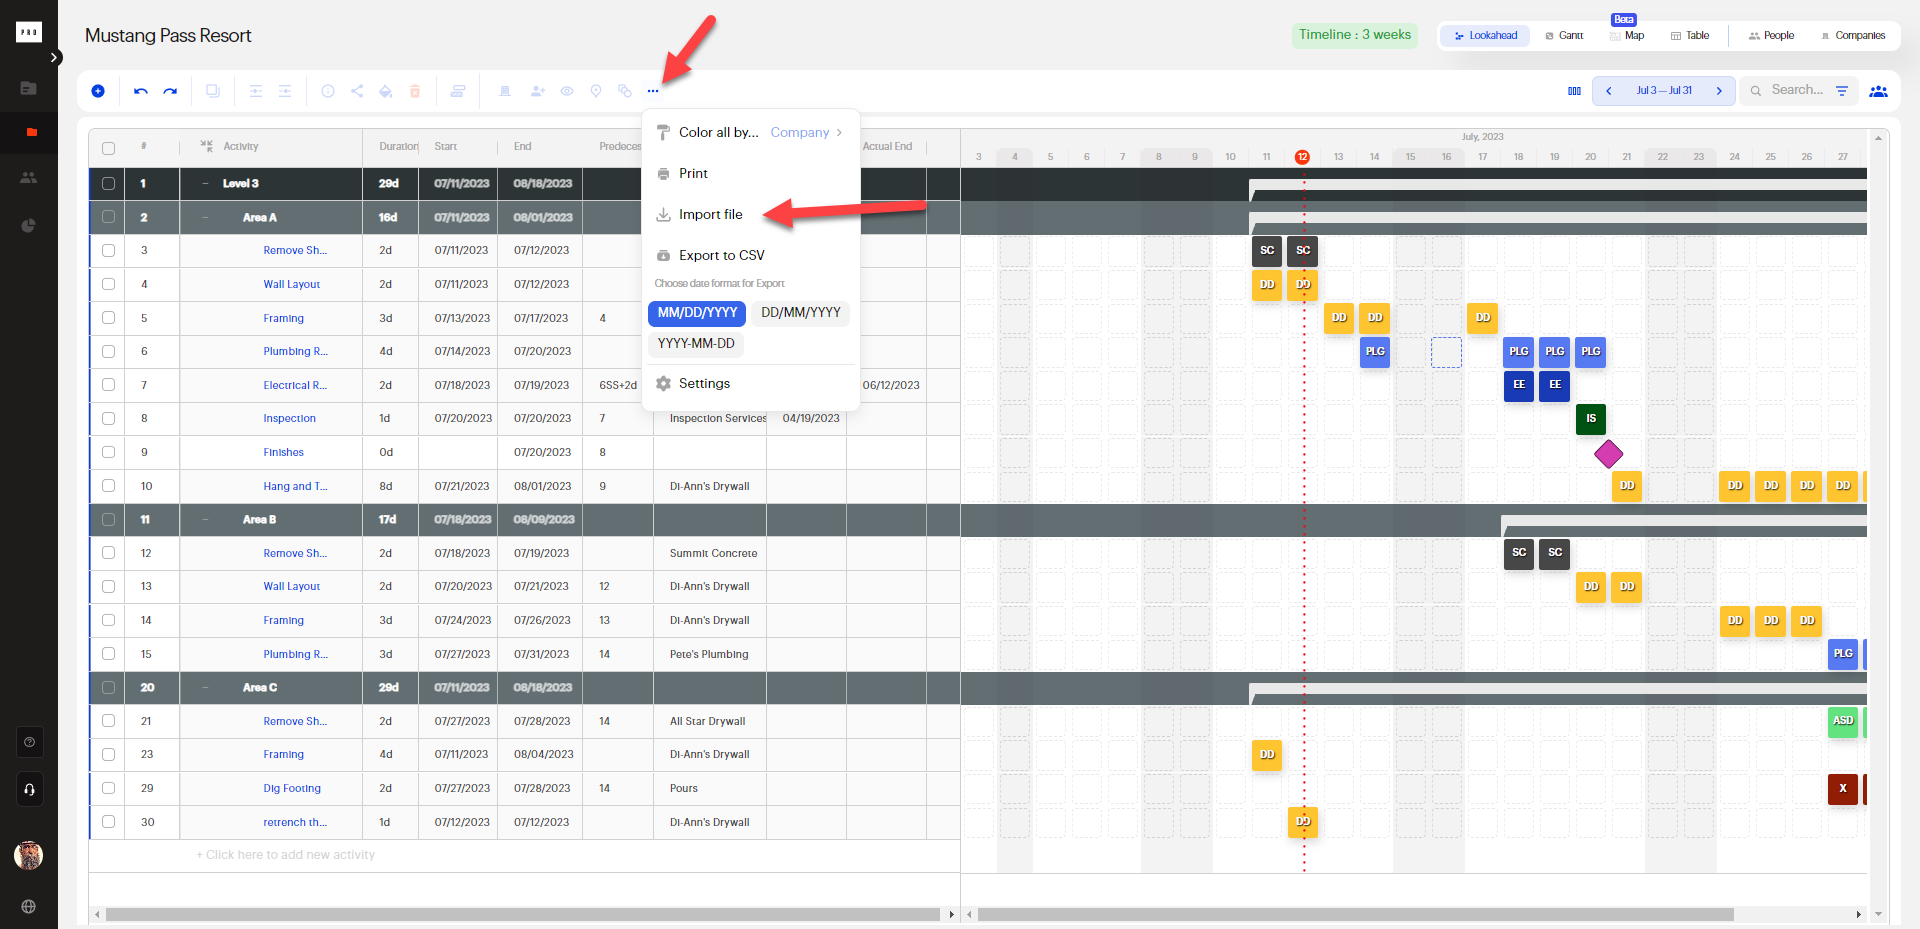
Start by clicking on the center nav bar and selecting the three dot menu in in Crews by Core and then clicking the Import file button.
Supported File Types
Currently, for the Crews by Core Import File feature, you can choose files that are:
- MS Project .mpp file
- Primavera P6 .xer file
- CSV (or Comma Separated Values) file
CSV is the standard format that can be used if you manage your Projects in MS Excel (or Google Sheets). Those programs support exporting your file into the .csv format which can then be used to import into Crews by Core.
Click on the “Upload” button to browse and select the file you want to Import.
Mapping Field Names
A new screen will appear where you will need to step through an initial Field Mapping exercise. The very first time you Import a File, you will be prompted to Map the Fields from your file to the fields in Crews by Core. You only need to do this once for each project; after that, the field mappings are saved for the next time you run the Import File.
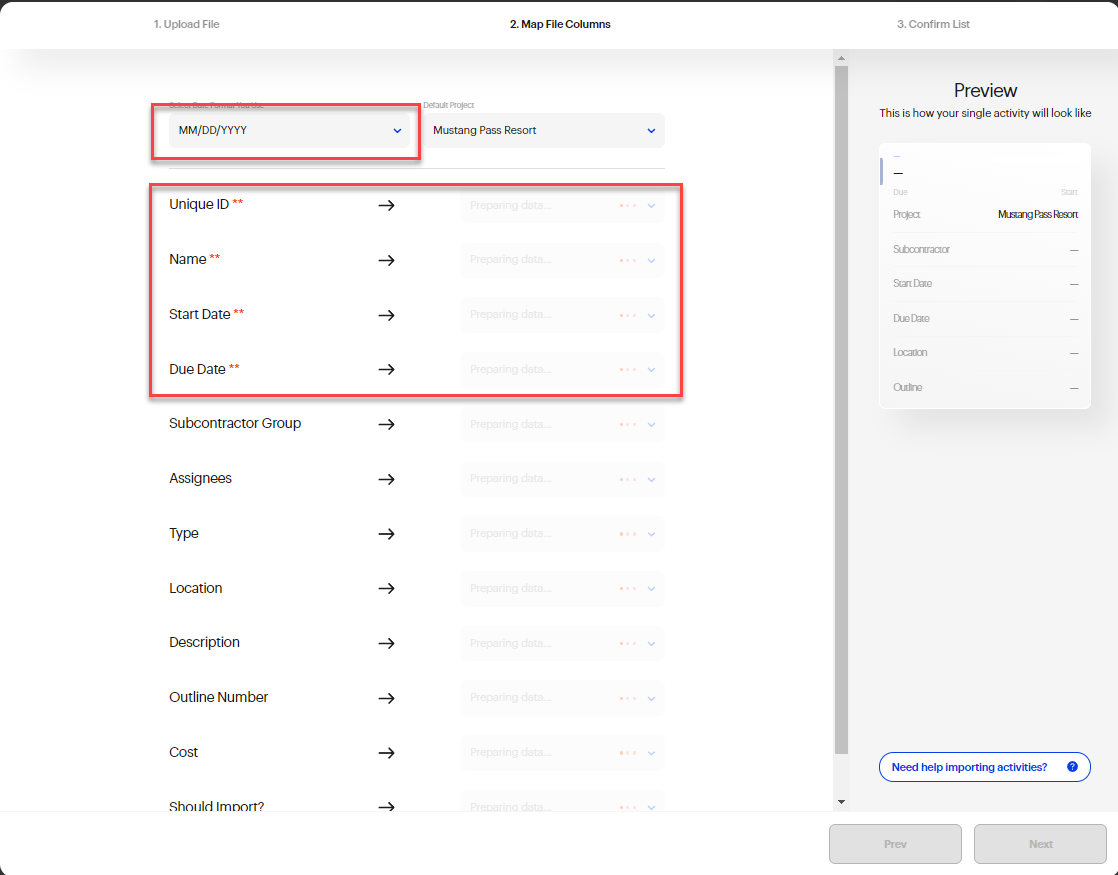
Date Format
You can choose the date format that your file uses. Please be sure that your selection matches how the dates appear in your file. Options include:
- DD/MM/YYYY
- MM/DD/YYYY
- YYYY-MM-DD
Minimally Required Fields for Import
- Unique ID: This field should be the field you use to uniquely identify Activities in your project file. If you don’t have a Unique ID equivalent, you can select the drop-down option to “Auto Assign Activity ID” which will automatically generate a Unique ID for each Activity imported into Crews by Core.
- Activity Name: a short name for that Activity
- Start Date: the estimated Start Date for that Activity
- Due Date: the estimated Due or Finish Date for that Activity
Additional Helpful Fields
In your Import File (.mpp, .xer, or .csv), we suggest inserting some custom columns/fields which can be used to prepopulate the Activities in Crews by Core with additional Activity information and save you time in manually typing information.
These fields will help you quickly assign Activities, allow workers to see additional Activity details without needing to ask for clarification, allow project managers to filter and view groups of Activities by Subcontractor, Location, or Activity Type.
Subcontractor or Responsible Party
If you are managing multiple Subcontractor crews who will be assigned to different Activities in your project, it will be helpful to include the name of the Subcontractor for the Activity or group of Action Items.
This allows you to quickly identify/filter Activities when reviewing or performing walk-throughs with that specific Subcontractor.
Assignees
If you already know the Project Manager, Foreman, or Worker(s) who will be assigned to the Activity or group of Actions, you can include this in your project file.
Add a column titled “Assignees.” In the row that you want to assign workers, type in the names of those workers exactly as their name appears in the Crews by Core Worker List.
When adding more than 1 worker name to that field, you can use any of the following delimiters or separators for the list of names:
- / this is the forward slash
- | this is the pipe (or vertical slash)
- , this is a comma
- ; this is a semi-colon
- : this is a colon
Example for the Assignees field: “Joe Smith / Tim Brown / Al Davis”
Double check spelling, accents, etc because assigning workers with misspelled names will not work if the system can’t find the worker’s name. “Sam Smith” is not the same as “Sam Smth.”
Some company projects will assign the Foreman of the crew in the Import File. That Foreman can later on add additional Assignees from the app.
Example: Joe Smith is the Foreman of DE Builders subcontractor group. The Project Manager might not know who else to assign the Activity to but they can add Joe Smith’s name to the Import File and later on, once Joe Smith sees the Activity in his App Activity List, he can assign it to members of his crew.
Activity Type
Prefill your Activity Details with any custom tag you wish so that you can easily filter for Activities with certain tags.
Activity Location
If you have a large job site, it may be helpful to include the Location of the Activity so Workers can easily identify where they should be performing their Activity.
This is especially helpful if you have a lot of repeat/similar Activities but for different locations - e.g. 1st Floor, 2nd Floor, 3rd Floor or Tower 1, Tower 2, Tower 3, etc.
Activity Description
If you are using brief Activity Names, you may want to include from your Import File a field/column that has additional Activity information.
For example, your Activity Name may be “Paint”, but you could have additional detail in the Description field to include the Brand, Color, etc and/or instructions.
Advanced Field Mapping Functions
In addition to the above mapping fields that will pre-fill Activity Details during Activity Creation, Crews by Core also supports Field Mapping to help you more easily manage and navigate a large list of Activities and Action Items.
Outline Number
You may be using the Outline view in your project software to view Parent Activities and related Action Items. These typically appear in an indented tree structure view format. Parent Activities help you group related Action Items so you can visually manage those Actions.
If you want that same Outline structure in Crews by Core, then you can map the “Outline Number” field in MS Project to the “outline_code” field in Crews by Core.
Be sure when you run the Import File, that you also include the Summary Activities in your import; otherwise your indented Action Items may appear odd without a Summary/Parent Activity above.
Archive Activities
If you have a large project with many Activities spanning a long timeline, and you have many Activities which have already been completed and the dates were in the past (e.g. 4 months ago), you may want to use the feature which allows you to mark Activities as “Archive Activities?”
Create a column in your project file called “Archive Activity” and use the values “Yes” or “No”. By default, the value should be No, so you can see these Activities in your Active Activities List. Make sure you map the field in your file to the “Archive Activity?” field.
In MS Project, this custom column would be a “Flag” field type which automatically gives you the Yes or No options. You can rename the Flag to “Archive?” to make it easier to read.
If you want to mark certain Activities as Archive, then set that field value to “Yes.”
When you run import, only those Activities with “Archive Activities?” set to “Yes” will be moved to the Archived view in Crews by Core.
Click on the “Archived” tab in the Filters box to switch your view to only Archived Activities.
Click on the “Active Activities” tab to go back to the Activities you’re actively managing.
Should Import?
Similar to Archive Activities, if you have a large project file with many Activities spanning a long timeframe, you may want to only import certain Activities that fall within the next month, two month, or three month timeframe. This allows you to have a more manageable view of Activities.
Create a column in your project file called “Should Import” and use the values “Yes” or “No”. Make sure you map the field in your file to the “Should Import?” field in Crews by Core.
In MS Project, this custom column would be a “Flag” field type which automatically gives you the Yes or No options. You can rename the Flag to “Should Import?” to make it easier to read.
If you want to mark certain Activities that you want to import, then set that field value to “Yes.”
When you run import, only those Activities with “Should Import?” set to “Yes” will be created or updated in Crews by Core. You can go to your Project Activity List to see those Activities.
A note about Outline view:
If you are also importing Action Items using the Outline Number field, it’s important to remember to set the corresponding Parent Activities to Should Import as well. Otherwise, you may have Action Items which do not display the Parent Activity when viewing in Outline Mode.